Wednesday, November 2, 2011

Some 1156 LED Bulbs Are Just Too Dim


In June of last year, all the regular ole overhead bulbs in my vintage Airstream were replaced with modern-day, low-power, Light Emitting Diode light bulbs.

http://adventuresofacuriousfellow.blogspot.com/2010/06/let-there-be-led-light.html

Two months later, a few of the original bulbs were returned to their sockets because the vintage trailer’s dark cherry interior absorbed a lot of light.

http://adventuresofacuriousfellow.blogspot.com/2010/08/let-there-be-less-led-light.html

Yesterday, the remaining interior, LED bulbs were removed & replaced with the Overlander’s original incandescent bulbs. The only LED bulb in place now is mounted in the exterior scare light.

Had these LED bulbs been made with super-bright LEDs, I probably would have not had this problem.

Plans are to keep my eyes open for new products – the primary reason LED bulbs were considered was to save my OEM light fixtures’ lenses & switches.

Monday, October 17, 2011

Repeat As Required


The Boyz’ fall break found us & the Airstream on the road to St. Augustine Beach Florida with the Mighty Suburban, as usual, on point.

The first leg of the two day trip there had a new twist to it because Daniel was signed up to take an on-line test at a designated time in preparation of potentially becoming a contestant on a kids-week episode of Jeopardy! Not knowing how traffic would be, Kim made reservations at campgrounds with WIFI in two different cities to ensure the best chance of connectivity.

All appeared well until the test site became available 30 minutes prior to test time. The site would not let Daniel in because it thought our NetBook’s screen resolution was inadequate.


Fortunately, the campground had a guest computer in the front office which was more to Jeopardy's liking. Daniel thinks he has a shot at making the show.

This was the first long-distance trip with the Burb’s repaired air conditioning. For the first time in memory, I had to blend a little heat in on the lowest cool setting to keep everyone from getting too cold. A side benefit was the happiness kept my mind off the fact that the brakes had started pulling a little to the right under certain conditions.

We arrived safely at St. Augustine Beach, and set up camp under misty & windy weather. Deciding the beach would be no fun under the current weather conditions, we boarded a tourist trolley, and took in the sights of the oldest continuously occupied European-established city and port in the continental United States.


Day two of our two day visit found 30 mph wind with 8-10 foot sea swells.


Checking under the hood the night before leaving, I was surprised to find the rear reservoir portion of the master cylinder devoid of fluid. Having neither tools nor desire to troubleshoot the issue right then, the symptom was treated with a new bottle of brake fluid. Fortunately, even 446 year-old cities cannot escape having an AutoZone.

As expected, the corrective action had no effect on the brakes. Since the issue was with the brakes “pulling”, instead of “not stopping” we left St. Augustine Beach behind us.

Arriving at our halfway-home layover campground, I noticed one of the Airstream’s two LPG cylinders had run dry. To my surprise, the campground would not refill it citing the tank’s cert-date of 05/05/04 was too long ago. It’s hard to believe we’ve been Airstreaming for eight years now. Time flies when you’re having fun.

Oddly, although I knew that gas bottles need periodic re-certification, this was the first time I could recall anyone actually checking before refilling. No worries for the trip, though because the other tank sufficed for what was left of our vacation. We arrived home the next day without incident.

The Suburban’s maintenance log indicated the last rear-axle brake work was done in 1998. Only the shoes & seals had been replaced. Not that I forgotten doing the work by any stretch – It was the first full-floating rear axle I had ever worked on. Eight bolts to get the wheel off, and another eight bolts to disconnect the half-axle shaft: all by hand. Amazingly, only one special tool is required.


Nowadays I have a pneumatic impact wrench to help with some of the muscle work. A special tool wished for then as well as now to remove the hub/wheel drum assembly was an overhead crane – it was seriously heavy 13 years ago, and now felt 20 pounds heavier.


As suspected, the RH wheel cylinder was found to be visibly leaking. But I guess after 214,000 miles over 27 years it’s entitled to. The LH wheel cylinder’s leakage was still contained by the dust boot.

Brake return springs on any vehicle are tough to attach & detach. But the size spring needed for these 13” X 2-1/2” brakes adds quite the challenge to working on this truck. Although I remember the springs being especially tough to work with in ’98, I almost couldn’t extend them enough this go-around.

With a tenet of brake service being “repeat as required”, a younger person might have to perform the next iteration’s rear brake work - There’s no reason to break up a good-looking combo with a new truck.


.

Friday, September 30, 2011

New Scrapbooking Table for Kim


One of Kim’s enjoyments is documenting our family’s life in Creative Memory type scrapbooks, and she is quite good at it. But between that, and making flyers & stuff to support the Weatherly PTA, and helping Jared with his homework, she started getting cramped for workspace. In addition, since the folding tables being used were constantly needed for other activities, constantly setting up & tearing down was getting more irritating with each iteration. Permanent workspace, and more of it, was needed.

When she ran her idea for an L-shaped layout past me, I thought it did not work that well with the existing TV/VCR cabinet.


I believe she thought likewise, but may have thought the cabinet was a sacred cow to me since it came out of my shop many years ago. At the time it was built, though, it was supposed to be a prototype, and did not even get painted until a few years ago.

Kim appeared quite willing to run with my suggestion of yard-selling both the cabinet & TV, and replacing the TV with a wall-mounted flat-screen.

After adding new, higher, power & cable outlets, the new TV was mounted first just to make sure the project’s footprint still worked.


Home improvement stores usually do not sell plywood with which I am comfortable for cabinet construction. But the big orange one happened to be selling flat, ¾”, seven-ply, Peruvian plywood, which looked like grade AB to me, for a very reasonable price.


The shelves for the paper –holders at either side of the work table were planned to be ¼-inch hardboard. But neither of the home improvement stores sell it in full sheets anymore. Fortunately, a local lumber company stocked ¼-inch MDF. Although there is little difference between the two, anyone who cared would never be able to tell since the paper holders were to be painted.

The carcasses were made of 3/8” BC plywood left over from the porch project and converted to BB with wood filler. The end grain was covered with basswood strips.

The work surface itself was laminated with special-order Formica. Nowadays, Formica is thin enough to roll up for shipping. It flattens back out after being allowed to relax overnight.


The project’s construction was split into two phases – Table, and paper-holders. Wall-mounted ledger boards support the outside of the table while a book case and sideboard support the ends. To keep from having a leg in the middle of the “L”, a ¾” piece of angle iron was screwed to the bottom to carry unintended loads.


Biscuits were used primarily to keep everything aligned.


The table was then disassembled and after painting, reassembled in Kim’s room to make room for the project’s next phase.


Kim already had a couple of paper-holders which were each half the height of what was needed. At one time, double-height units were available. Unfortunately, a current search turned up nothing. So I got the “fun” of priming & painting each side of the 22 boards (prime, dry, flip, prime, dry, flip, paint, dry, flip, paint) which make up the two full-height organizers with shelves spaced to Kim’s specification.


To avoid paint buildup in the shelf dados, the cuts were made after the side boards had been painted. I had never dadoed a board after painting, and was concerned about the paint scraping off at the tablesaw. Fortunately, no touchups were necessary.

While I was happy with how the project turned out, Kim was simply ecstatic about now having lotsa permanent workspace. Jared thought it was pretty neat, too.


Well, that’ll about wrap it up for this edition of The New Southern Workshop. If you’d like a measured drawing…

Just kidding; no plans are available – I figure only the husbands of Kim’s scrapbooking friends would be inquiring, and I doubt they do so willingly.


.

What's Big, Tan, & EASILY Holds 250 Pumpkins?


The Mighty Suburban, of course!

Kim & one of her friends went up to Tennessee this morning to pick up the pumpkins for Saturday's Weatherly Elementary's Fall Festival.

Sunday, September 25, 2011

Truth, Justice, and Tom’s Bathroom


The old master bathroom, where I get ready for work every morning, has bothered me since before we built what is now essentially Kim’s bathroom many years ago. The mirror, which we had installed when the room was still the current master bath, had a slight tint in the glass which reflected the blue-painted walls with an unappealing greenish hue. While the simple solution would have been to repaint the room a different color, room-prep due to paint “oopsed” on the tile grout, looked like it was going to take a lot of time. Between having no idea of what color to paint the room (I didn’t want a girl to pick one out), and the fact that I really don’t like to paint, the room languished.

I am a big fan of Superman as he was portrayed in the 20¢ DC comic books I used to collect as a kid. Although George Reeves pre-dates me, I remember enjoying some of his B&W rerun adventures as Superman, especially the times he would stand confidently while a hail of bullets bounced off but invariably duck when the goon threw the spent revolver at him.

My admiration for the Man of Steel never dimmed, and over time I collected a small amount of Superman memorabilia in “Tom’s room” which brought a smile to my face every time I walked by.

While shaving one morning, it dawned on me to consider wallpapering the room. After walking by my Superman collection on the way to get dressed, I immediately knew what pattern I wanted.


I had to get a girl’s help after my epiphany – After I was unable to find much more than a Superman room border, Kim’s help was requested, and she located two wallpaper selections online. We both agreed the Man of Steel’s reflection in the mirror would look better on a white background.


Although I did all the prep work, we hired a man to hang the paper because I have known since my mid-twenties that I would never hang paper myself: My best friend Steve’s wife Sue was keen on wallpaper, and Steve got extremely good at hanging it. At some point, I would stop by their house and tell Steve how great I genuinely thought the current room looked. He would invariably respond with, “Yeah, I’m real happy with it too, except it you look right here…” He would then point to something I, in my wallpapering ignorance, would have never picked up on had it not been pointed out. I knew then & there that I would do the exact same thing if I were to ever paper a room. Ignorance can be bliss.


That’s a new toilet, too – 1.3 gallons per flush. Instead of a toilet close-up, here’s a zoom-in on the wallpaper pattern.


All’s now well in Metropolis. Every morning’s reminder about Truth, Justice, and The American Way definitely helps get my day off to a good start.


.

Saturday, September 24, 2011

Stereo Is Not Dead At My House

When it comes to enjoying music or movies, I am of the old “I only have two ears, and all’s I need is two really big speakers” school of thought. Dolby 7.1 is the rage nowadays, and if it had been around 20 years ago I would probably have 7 speakers & one subwoofer in my den. But for what I generally listen to, a decent stereophonic setup is fine.

I was almost forced to change my approach a few weeks when my third Luxman receiver bit the dust. None of the local big-box stores offered a replacement which only drove two speakers. While the Internet offered a small selection of suitable direct-replacements, my desire to upgrade to a tuner capable of decoding HD Radio signals reduced receiver offerings to zero. It was time to consider the individual component route.

Better sound quality & general versatility are the highlights of building a sound system piece-by-piece. But doing so is usually pricey due to what I consider a “snob cost” being added to each component by the manufacturer (real audiophiles should be willing to pay more). Fortunately, I only needed a tuner and pre-amplifier since main amplification is done by a very snobbish (back in the day) Yamaha amplifier.

Surprisingly, new HD Radio tuner prices are not that bad. That bit of cheer helped offset the fact that new pre-amp prices are still ridiculously high. Fortunately there’s eBay. I was able to win a more-than-suitable Onkyo P-3200 pre-amp for what I thought was a reasonable cost. And it worked as advertised when I got it.

After re-assembling Stereo Central with a new HD Radio tuner, and the gently-used Onkyo pre-amp, life appeared to be complete.


Unfortunately, my cordless headphones didn’t much care for the new setup.


Since I get a lot of mileage out of headphones at night when everyone else is asleep & I want to watch TV, the headphones’ disdain was not taken lightly.

The problem was that the headphones’ base station used to be plugged into the receiver’s headphone jack, and there is no headphone jack on the new setup. I had hoped the headphones would work well on a line out jack. They did not – the signal-to-noise ratio made them unlistenable.

Remembering that computer speakers have a built-in, low power amplifier, an old set was cannibalized for the effort.


Velcro is easier than driving screws into solid TN white oak.


Life is now idyllic again. A big shout-out to eBay-er onekg70 for helping it happen.


.

Monday, September 5, 2011

The Mighty Burb Even Impresses Kids


The Mighty '84 Suburban effortlessly guided us to & from the Smoky Mountains for the Labor Day weekend. I was quite pleased with the results of my first, real A/C repair - Kim needed her binky for both legs of the journey due to to how well the air conditioner worked.

We had to break camp in the rain, and at one point Kim was standing by while I was doing all the outside things us guyz do when a young person (10-13 yr-old) from the site next to us noticed the activity, and shared with Kim what an awesome tow vehicle he thought we had, and how impressed he was at the good shape it was in. He also commented on how neat the Airstream was.

The day before, a lady who I assume was the young fella's mom, had shared a similar sentiment while getting out of their Toyota Tacoma. The Suburban's amount of covered storage space probably caught her eye.

Our vintage combination does look good on the campground.


I wonder if a new tow vehicle is in that family's future?


.

Friday, September 2, 2011

A.C.E Cinematographers Like Wet Streets

Cinematographers appear to think the action scenes photograph better for movies.

I'm no A.C.E., but a freshly washed vintage Airstream coupled to a freshly washed vintage Suburban sitting on a wet driveway looks good to me.


We're headed out tomorrow at 0'dark thirty for the Smoky Mountains, and I wanted us to look good for the trip.

There's a favorite picture of mine that features my four-year old washing my Overlander in preparation of our first trip to Disney.


I wanted to get him involved with the latest effort, but it is now seven years later, and he was wrapped up with the academic team at middle school. We all know education comes first.

The original plan had been to leave today for the Smoky Mountains. But last week we found out our 6th-grader had already asked a girl to the first Middle-School dance tonight. Some things are more important than schedules - we'll leave tomorrow.


.

Saturday, August 27, 2011

Kim's Dowry

When my wife & I married in '94, we both already had established spice cabinets to combine. One of her spice cabinet's bottles contained whole Allspice, an ingredient not common to anything I cooked with up to that point. So it got added to "our" spice cabinet to languish until needed.


Recently, I was making a new-to-my-discriminating-family dish, and a had a fond memory of a Kim-predecessor making a similar meal for me at her place which included whole allspice during the cooking process.

Worried that the family might not react favorably to a strong flavor of allspice, Astor's Whole Allspice was fished out of the cabinet to add whatever contribution it could after probably more than 17 years.

Its contribution was surprisingly stronger than anticipated. Fortunately, no one appeared to consider it overpowering, and the meal was enjoyed by everyone.

So I now know pork with whole allspice can be rotated in every so often & be eaten by everyone. When Kim's dowry runs out, I will be curious to see if new, whole allspice will be that much different from what Astor sold many years ago.


.

Tuesday, August 9, 2011

Tom’s A/C Wërks

Back in high school, when working on cars first appealed to me, there were two parts of a typical automobile I stayed away from – automatic transmissions, and air conditioners. The 1975 General Motors Shop Manual’s description, complete with cutaway drawings, of how the Turbo-Hydra-Matic 350 transmission found in many cars of the era functioned dumbfounded me as a 14 year-old, and I concluded the devices actually work by magic. On the flip-side, air conditioning, while easy to understand, required an expensive foundation of special-purpose tools upfront to do anything. Fortunately, the need to service either system never arose back then.

A few years after we got the Mighty 1984 Suburban, its automatic transmission started shifting strangely. Still in awe of the gear case, I let the wizards at Automatic Transmission Company Inc. wave their Elder Wands over it, and rebuild its sparkle.

Within a year or so of the transmission work, the Burb’s air conditioning compressor started making noise the radio could not cover up. After checking around & finding that Danny’s A/C Shop was highly thought of, I let him install a rebuilt compressor which worked just fine. Years later, when I added a rear-seat air conditioner to the truck, Danny was asked to tie it into the system and convert from the old R12 refrigerant to the new ozone-friendly R134a. The end result was a comfortable truck. Nothing like a new car,but I was not expecting it to be; I was happy with the re-fit.

Last year, the compressor started blowing out more oil at the shaft seal than I cared to see. Wishing to preempt a sudden loss of A/C while on a Florida camping trip, I asked Danny to install another compressor. Another rebuilt one was fine with me since the last one had lasted a more than reasonable number of years and it had not even quit. That was a mistake, and I did not even know it at the time.

At the start of the next cooling season, the air conditioner did not work. Danny subsequently decided all the refrigerant had escaped from a leaky conversion fitting he had installed. Considering it warranty work, Danny fixed it & charged me nothing. A few months later, the compressor locked up coming home from Hot Springs Arkansas. Since it had been less than a year since the initial replacement, Danny installed another compressor at no charge.

That compressor lasted less than 300 miles before locking up. The fishy part was that the A/C did not cool very well the short time it ran – Even before we lost cool air, scheduling was being discussed to take the truck back to Danny. Once again, Danny replaced the compressor at no charge. Unfortunately, the A/C’s performance after that round of work was marginal. But with cooler weather approaching, the truck did not see Danny’s shop for the rest of the year.

This year’s cooling season once again found the Suburban’s A/C worse than the previous year’s. I took it back to Danny, and outlined the marginal performance. He said he would replace the orifice tube. So, once again, Danny re-filled it for free, and once again he blamed the leak on the same fitting. I dreaded picking up the truck because of suspicions that the A/C was still going to have only marginal performance. Sadly, my suspicion was confirmed. Whether Danny did not know what the problem was, or his heart wasn’t in fixing it, I’ll never know. It was obviously time for another course of action. I stopped by an auto parts store on the way home to buy R134a gauge adapters to allow an old, R12 gauge set I had picked up years ago, but never used, to connect up to the truck.

Many days of reading about automotive air conditioning ensued to both get up to speed on the subject, and decide whether I wanted to repair the A/C myself or find someone who could troubleshoot a 26 year-old truck which was not cooling with the refrigerant with which it was originally designed. Between reading about what the repair was probably going to cost, and finding no potentially trustworthy repair places, a nice Mastercool vacuum pump was purchased to signal to …well, me… that I was going to fix the Mighty Suburban’s A/C myself.

Blending my new-found knowledge with the truck’s symptoms, I posted a general question on an automotive air conditioner forum wherein I wondered if too much oil in the A/C system could be a cause of the truck’s lack of cool. I was immediately beat up by the resident talent for not posting pressures, actual temperatures, etc. Although they’re right to badger about me for not including important information, I sure do hate being a newbie on Internet forums.

So, I whipped out my 16 year-old “new” gauge set, R134a adapters, and proceeded to gather data for my second post. Unfortunately, the post ended up being about my high-side gauge hose blowing apart at only 320 psig and shooting oil & refrigerant all over the place.


The forums’ response was for me to purchase a decent set of gauges. But one guy did provide a link to a good set which I did order. The gurus uniformly agreed that the only way to figure out what ailed the system was to tear it down & note the amount of oil & refrigerant present while keeping an eye out for trouble.

The next hurdle was to recover the remaining refrigerant. Professional shops use recovery carts which can cost many hundreds of dollars. While some people just vent the system’s refrigerant to the great outdoors, that’s not ecologically friendly. I’m not a tree-hugger but I am a tightwad – The Suburban holds at least $60 worth of R134a which I wanted to recover as cheaply as possible.

My solution was to vacuum all the air out of an old 15 lb refrigerant container a friend gave me, connect it to the Suburban via the un-ruptured parts of the gauge set, and stick the recovery vessel in a quilt-covered bucket of ice. The cold environment kept the tank pressure lower the Burb’s A/C system, and the liquid refrigerant distilled out of the truck.


Knowing that the recovery process would be slow, I went off and cut the grass. A couple of hours later, the tank was 68.2 ounces heavier, and the low-side pressure gauge told me there was no liquid refrigerant left in the truck.

Modern-day vehicles have a sticker under the hood which lists the amount of oil & refrigerant the correctly operating system requires. The Burb has no such sticker, and Internet charts start with Suburbans two years newer than mine. Fortunately, the guys at the A/C forum were able to tell me my vehicle is supposed to have 10 ounces of oil.

During the teardown, 16 ounces of oil was recovered.


Between the hose blowout, and what I could not catch during the teardown, I figure the system had at least twice the amount of refrigerant oil it needed.

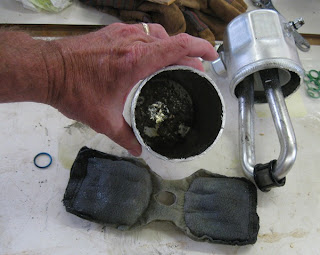
The oil in the original R12 system was mineral-based, and is not compatible with an R134a system. Modern-day systems use a glycol-based lubricant. The old mineral oil is supposed to be removed during conversion from one refrigerant to another. If you look closely at the smaller cup, you’ll notice the fluid has separated. I’m pretty sure that’s mineral oil on the top and R134a-compatible lubricant on the bottom.

It appears my trust in Danny was misplaced. The expansion tube in the system looked like it had accumulated debris from two locked up compressors.


While the accumulator’s ostensible purpose is to accumulate refrigerant & oil, it also filters the oil & removes trace amounts of water from it. Although welded together during manufacture, Mr. SawzAll helped me get a peek inside.


It too looks like it has seen the debris generated from bad compressors. Fortunately, all the refrigerant lines flushed out clean, so it looks like the latest compressor is okay.

Waiting for the new manifold gauge set to arrive gave me time to draw conclusions on what I had seen. It all started with the compressor. The very first one Danny installed was remanufactured by APCO, and from my homework prior to installing the rear A/C I knew it to be a top-notch brand. What I did not pick up on at the time I asked Danny to replace it was that he had switched suppliers, and the subsequent compressors he installed literally had no names to be found.

Most professionals will advise accumulator replacement anytime major work is done on a system. All will MANDATE accumulator replacement anytime the compressor craps out - If it’s on the customer’s nickel.

The Internet is full of tales of people going through several rebuilt compressors before finding one that works for any period of time. My latest one appears to be hanging with me, and as evidenced by the blown gauge hose, is still able to produce good pressure. I decided to stick with it for now.

A new accumulator, orifice tube, O-rings, and the prescribed amount & type of R134a refrigerant oil (PAG 150) were installed, and the system leak-checked before the new gauge set arrived.


I was incredibly impressed with what I saw in comparison to the last set of gauges. Although the manifold appears similar in appearance to the other set, the hoses/fittings appear to be of a quality head-and-shoulders above what blew out before. Mastercool's hose description certainly reads better than the lack of description the last set had. If nothing else, the new hoses had a better "feel" to them (as in not potentially blowing apart later). It was also nice to have gauges with R134a markings.

There are no hard & fast charts on the proper load of R134a in a formerly R12 system – only guidelines based on the original amount of R12. One super-sharp forum member suggested starting at 90%, and monitoring the evaporator’s inlet & outlet temperatures to tweak the final refrigerant load. So thermocouples were zip-tied in place underneath the putty sealing where the lines entered/exited the housing. A third thermocouple was stuck in the dash center vent.


Frustratingly, the approach did not work. After awhile, the evaporator inlet temp got warmer than the outlet temperature. Apparently, the heat from the 325 psig high-side line was wicking past the orifice tube and affecting the reading. Short of disassembling the evaporator housing, there was nothing that could be done to get the probe out of this heat’s way. I was forced to give up on measuring differential temperature as a means of determining the proper refrigerant charge. So recharging was stopped at 90% of the R12 spec (75-7/8 ounces of R134a).

But that was enough – the vent temperature was markedly cooler than it was before this effort began. Although the gauges read like the retrofitted system was doing all it could do, since I’m both new at this, and never thought to check a vent temp the last time the A/C was operating nominally, I’ve had to rely on my “calibrated” hand for reference, and it’s not very quantitative. But the hand seemed to think it was pretty cool.

The pressures, temps, ambient weather, moon phase, etc. were posted on the forum and, to my relief, one of the gurus allowed that “… It looks pretty much in line with the expected results of a conversion on a big system like that...” There’s nothing like the voice of experience.

The truck’s been driven around & to work once, and I’m happy with the way it is now cooling. Of course the best test will be our next camping trip, but I have high confidence that my wife will be reaching for her binky.


.

Sunday, July 31, 2011

But You Must Act Now!

Inspired by Lynnafred’s enthusiasm in incorporating sausage into a non-traditional meal, the other night I opted to experiment with boneless-skinless chicken breasts, breakfast link sausage, and muenster cheese sprinkled with grated parmesan and baked as an entrée for the night’s supper.

While I’m no chef by any means, I knew from experience that the chicken would need to be pounded down before it could be rolled around my inspired choice of ingredients. For some reason, though, our store-bought meat tenderizer was nowhere to be found. Who knows – I use it so infrequently it might have been sold in one of Kim’s yard-sales. But since I was pumped to make this meal, my shop provided me with something which accomplished my goal.


This particular 2X4 cutoff, left over from the front porch project, did an unusually good job of flitterizing the chicken despite not having the “teeth“ my missing meat tenderizer had.


The family subsequently agreed, during the course of the meal, that the chicken had the perfect thickness/consistency for the effort. They also uniformly agreed that this was a meal they never wanted to have again. Win some, lose some – I liked it. But I like cafeteria food too.

A day or two later, the well-balanced block of wood was still in the kitchen when the need to pulverize some ice to make an ice-bath to calibrate two temperature sensing devices presented itself. I have never had such an easy time making big ice cubes smaller.


Then it struck me – you may have noticed in the opening picture that this particular piece of wood came from either Winchester or Douglas county Oregon. If you’ve ever seen the Amish working hard at producing miracle space heaters on TV, then you might have an appreciation for why this board worked so well at what I needed it to do.


I have a small supply of Winchester or Douglas county Oregon lumber left over. Quantities are limited. I would like to GIVE anyone who asks a short length of this miracle, multi-purpose, kitchen device. Simply pay $19.95 shipping & handing, and IT’S YOURS FREE!

But if you act NOW, I will include TWO perfectly sized blocks of Amish-associated wood for FREE (just pay S&H on the second board). Call within the next two hours – Operators are standing by.


.

Saturday, July 23, 2011

A Gardener I am Not


This year's garden is a bust unless you are a Munchkin.

Friday, July 15, 2011

The Airstream’s Half-Family Trip

When the possibility of Kim & Jared spending two weeks in Birmingham came up, we decided the best plan was for me to tow the Airstream down to a campground close to where they would be spending most of their time. As plans were being finalized, Kim’s mom accepted an invitation to join them there for however long she wanted to stay.

The three of them are now close to half-way through their visit, and Daniel & I are planning to motor down tomorrow so we can be a family again for a short time. We're all looking forward to seeing each other.

In the meantime, Daniel is being introduced to what "baching it" entails

When the Cat’s Away, the Mice Will Clean

For some reason, he thought the dancing girls were going to clean house for us...


.

Wednesday, July 6, 2011

The Candlestick Maker

Rub-a-dub-dub,
Three wicks in a tub,
And how do you think they got there?


Most everyone familiar with a campground setting appreciates the ability of citronella candles to limit the number of bugs & gnats buzzing about the site. We’re no different, and always have a variety of citronella-based products on hand at every outing.

A few camping trips ago, the workhorses of our citronella arsenal, two triple-wick Cutter-brand candles, suspiciously quit burning at about the same time. Reading the label (which apparently I was supposed to remove before use) the manufacturer claimed “burns up to 40 hours”. While there is little doubt these candles each have at least 40 hours of burn-time, both still had plenty of wax, and this annoyed me because I’m used to replacing candles only when there is little or no wax left to burn.

Wondering if the wicks had been damaged somehow, several dollops of wax were removed from each candle to expose more wick. No joy –neither candle would keep a flame on any of the wicks. We ended up pulling out several smaller candles to fend off bugs during the trip’s remainder.

These big candles are not all that expensive. But since there was so much wax left in both, I hated to just toss them & buy new ones. So Kim bought us a bag of new wicks a few days after returning home, and Tom’s CandleWerks was established at the grill’s side burner.


After gently warming the wax, the remains of the old wicks were picked out with pliers. Comparing the old & new wicks, it was immediately clear why the candles had stopped burning – the original wicks had a metal collar to keep the wick from burning past a certain point. These candles had been designed to burn up to 40 hours and no more.


If I was a business man, I would applaud the Company for a novel way of forcing unsuspecting consumers to replace nondurable goods before the good is truly depleted. But in this case, I am a consumer, and my general thought is “bastards!”

The re-wicked candles worked beautifully during the next camping trip.

Even though the only candles I burn are on the campground, the relative easiness of the task, and the 80 wicks left over from the effort, inspired me investigate candle making as yet another hobby. It was a short investigation – It’s considerably cheaper to buy pre-made candles than to make them from scratch.

Just as well; I already do enough things the hard way.


.