Sunday, September 27, 2009

Baby Needs a Tank Liner


Last month, my ’91 Kawasaki ZR-750 “got new shoes” in the form of a significant amount of brake and front suspension work. “Baby” apparently now feels loved again, and, I guess, feels the time is right to reveal other issues.

The maintenance work’s check-out ride (after 100 miles of gentle break-in) must have been too intense because I walked through the shop the other morning to find a puddle of gas on the floor, and wrinkled paint on the gas tank’s bottom edge.

Irritatedly watching my current bike drip, my first thought was, “Am I to spend my life fixing motorcycle gas tanks?” as my first street bike, a ’77 Suzuki GS-750, had done the same thing. Then I laughed at myself after remembering the Suzuki’s repair took place around 21 years ago. Time flies between motorcycle repairs.


The GS-750 tank’s repair had been easy because one small blob of gasoline-rated epoxy fixed the one hole at the tank’s low spot. The Kawasaki’s tank, however, has multiple low spots, and looking closely, multiple pinholes of rust-out were found to be fighting their way through the paint. This tank was going to have to be KREEMed.

The idea is simple – Clean/etch the tank’s interior, rinse well, then slosh KREEM around. The coating will both fill in pinhole leaks, and leave a flexible plastic shell (in effect a new tank) behind. The activity has to be planned for one long session, though, because the Muriatic acid will eat the tank out if left too long, and the KREEM has to go in right after the acid is rinsed out.

As usual, the prep seemed to take as long as the task itself.


Blocking plates for the fuel pickup and gas gauge sending unit had to be made, and the existing leaks sealed with acid-rated goop. Afterwards, the tank was filled with two gallons of 10% Muriatic acid, and a vial of BBs (to help scrape off flaky rust). After preliminary sloshing, the tank was allowed to sit for 45 minutes or so.


It’s sitting in the yard to make it easier to hose off should new pinholes open up due to the acid bath.

After that, the tank was sloshed every 15 minutes or so until it appeared all the rust was gone. The tank was in worse shape than originally thought because the acid had to stay in for around three hours. And it looked pretty full-bodied after being drained.


After a thorough water rinse, the tank was then triple-rinsed with MEK before being KREEMed per the bottle’s direction (pour in, slosh around, pour out excess). To both expedite drying and lessen the concentration of explosive fumes, a gentle draft of shop air was directed into the tank.


The toughest part of this repair was keeping the acid and MEK off the tank’s outside because either would dull (or remove) the finish. I was 95% successful there.

I have heard tales of people starting a repair like this only to have the gas tank all but fall apart during the acid wash. Luckily, my tale does not fall into that category. Only one new, unexpected hole popped up during the effort, and it was small enough for the KREEM to seal.


It’s raining now, or I’d be out riding. Instead, I’m sitting here Blogging. There’s a song in there somewhere…


Tuesday, September 22, 2009

New Reese LevelAll Cover


My cousin Leslie and I, as little kids, often played together since we lived within easy bike riding distance of each other. One day around 1971, we were doing something in his back yard near his family’s Airstream when his dad walked by. Pointing to a plastic-covered round thing with two little capsules of something with an air bubble in each & mounted on the front of the trailer, I asked my uncle what it was & what it did. I remember his eyes kind of widening as he took half a step backward before mumbling something about the device being used to set the trailer up at a campsite. He then skedaddled inside before I could ask about the braided wire attached to something else.

While I have always been curious, years later I found out that my aunt & uncle were both a little on edge with someone as young as I was asking so many technical questions. My parents never complained, though, because, as my dad is not a DIYer, my curiosity kept all the appliances in our house working.

The ensuing years found my aunt & uncle becoming more & more comfortable dealing with me, and in late 2003 they decided their 1967 Airstream Overlander would be better off in my hands.

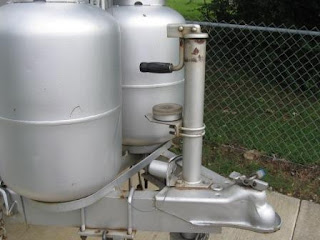
During the Airstream’s subsequent refurbishment, the object of 1971’s question was identified to be a Reese LevelAll. As most RVers know, proper RV refrigerator operation, among other things, requires a level trailer. The Reese LevelAll with its two perpendicular bubble levels, is mounted on a plate on the tongue jack, and inconspicuously provides a quick-reference for determining just how much level correction needs to be made.


Since the formerly transparent plastic cap had weathered and yellowed rather badly it was polished with #00000 steel wool. The effort helped, but subsequent camping trips usually found me unscrewing the cover to check level since Reese no longer offered a replacement cover.


A couple of years ago around Christmas time, I was perusing the web, and found what appeared to be the Reese LevelAll being offered for sale by Hitches for Less. Unfortunately, Santa found the item to be out of stock with no projected restocking date.

Jumping forward to a few weeks ago, the same site was found to be again offering the LevelAll, and I emailed them to check availability. Last week, they replied, “yes”, so I ordered a complete LevelAll even though all I wanted was the clear cover. As expected, the new cover mated perfectly with the 42 year old threaded shaft.


All is now well - Setting up camp will be easier. End of story… for me.

However, if you are now considering purchasing a LevelAll after reading about it, there are a few details about this latest Internet offering which may interest you. This newly offered indicator “isn’t your Uncle’s LevelAll” in that it is not of the same quality construction as was available in the sixties. And, the company from which it was purchased from does not offer the tongue jack shelf. So you may be on your own with respect to a mounting platform.

This product is NOT made by Reese Products of Elkhart Indiana even though lettering on the plastic cover (between 10 o’clock & 2 o’clock) would have one think exactly that. Interestingly, if you scroll up to the top of this page and take another look at the marketing image scanned from their package, you will find nothing but the word “LevelAll” at the top. Maybe the patent expired; maybe not – I don’t know.

But what I do know if that this current day LevelAll is not supported on three stamped feet like the old one was, and the resulting flat surface is more likely to capture water inside the assembly if not sealed properly after installation.

The bubble levels’ backing plate on my vintage LevelAll is anodized, and has no trace of rust even after being around almost as long as Frank has. Hitches for Less’s offering appears to be the same zinc-coated steel as the rest of the unit – rust is more possible (but not necessarily probable).

But, all said and done, if I was to buy another Airstream tomorrow, and it did not have a LevelAll, I would buy this one again. Now that I know what might go wrong over time, I can preemptively deal with it.


Tuesday, September 15, 2009

Big Tub Gets a Shade


Several years ago we added on to our house in an effort photo logged as Project Big Tub. While the actual construction had its ups & downs, living in the new space since then had been carefree until around six months ago when new neighbors moved in across the street.

Tom and Annie are really nice people, but part of their security plan involves leaving both megawatt front porch lights on all night, and most of the light was finding its way to our bedroom through Big Tub’s four-foot-square, glass-block window. A window covering had never been planned for that location primarily because the glass blocks distort possible viewing from Peeping Toms (present company excluded). Additionally, opening or closing the covering would involve crawling up & over Big Tub, and neither Kim nor I were real motivated to do that every morning & night.

So after we finally had enough of trying to keep Big Tub’s door closed to keep the light out, Kim got a local, window treatments company’s representative to come over one evening to outline options. In what made the selection process easy, there was only one option: a motorized, pleated shade controlled by a switch, remote control, or home automation system via serial communication, relay or RF signal. It could be battery-powered or hardwired. Since regularly replacing batteries is not my thing, I opted for the hard-wired option. If nothing else, running wiring constituted doing it the hard way, which is the way I appear to do everything.

While the vendor would have done a complete installation had this been new construction, the only thing they offered to do in this circumstance was to hang the shade after my designated electrical contractor had done all the wiring. While frustrating, this was not unexpected. So Kim had them measure the window, and signed us up for a packaged deliverable which included the correctly-sized shade, wall switch, 24 VDC power supply, and a spool of appropriate hookup wire.

After designating myself as the electrical contractor, the first plan had been to run the wiring underneath Big Tub. But remembering the bathroom’s rooftop gable, a framing close-out photo was pulled out of archive to see what, in addition to the header, could be a potential wiring obstacle.

Space was limited - Between the gable rafters being framed close to the joists, and the height of the joists’ ledger beam, fishing a wire into the main attic did not appear to be an easy task. But it was doable, and wiring through the attic still had more appeal than crawling under the house.

So I whipped out my trusty, 18 inch ship auger bit, and hoped no nails were in its path.
The first hole in the top of the window frame was a success. But of course, the wire fished no further than the bottom of the roof decking over the hole.

Fortunately, the can light over Big Tub itself had been assembled with screws instead of rivets, and could be disassembled & removed from its mounting frame for access to fish the wire over to the main attic. To my chagrin, after the can’s removal, no insulation fell out of the hole. Apparently, that small area was inaccessible to the guys who blew the insulation in during construction. I will have to address that at some point. But not just now.

The switch was mounted in the master bedroom immediately before the bathroom door. If we should someday get super lazy & decide to get the optional remote, this placement is ideal because the switch assembly has the remote’s infrared receiver. We could open or close the shade without ever leaving bed. Notice how many wires/connections there are on the switch?

The last hurdle was deciding where to put the 24 VDC power supply. Mounting it in the attic did not seem like a good idea because the power supply’s case, which resembles the power supply to a laptop computer, did not look like it could take the summer heat. Then I remembered the doorbell transformer – It is hidden in the top of the hall closet, and has 120 VAC running to it. So after closet wall modifications including the addition of an outlet, and a transformer shelf, the shade now had the right kind of power.

I could have painted the new wood, but it seemed like overkill for the unseen side of a coat closet. Plus I really don't like to paint.

In a really neat father-son moment, my nine-year son wandered by about the time the shade was ready to be lowered for the first time. While he knew I was up to something in the room in which he likes to swim, exactly what I had been doing had been, up to that point, had been perceived as “Dad’s tinkering with something…again.”

“Hey Daniel! Watch this!” I then bzzt two wires together, and the shade came down. The look on his face was a Kodak moment.

The wires were then bzzt again, and the shade went back up. I will not soon forget the “Cool!” look on his face.

Subsequent testing with the completed installation was also successful. Upon her return from participation in a five-family yard sale, Kim too was quite pleased with our bedroom’s new light blocker. And, there appears to be no need for a remote or home automation system - The Boyz now fight over who gets to raise or lower the shade.


Sunday, September 13, 2009

See Rock City & Ruby Falls


During past trips, Number 1 son always noticed that many of the old barns lining the highways and interstates of The Tennessee Valley were painted with signs directing travelers to Rock City and Ruby Falls. As a consequence, he added the destinations to our unwritten list of places to visit. This year’s Labor Day weekend seemed like a great time to take in the attractions.

Shortly after we arrived at Raccoon Mountain campground Friday evening, Kim and Daniel worked together to get supper ready while Jared & I held down the couch.


We took in Rock City the following morning. Kim and I had been there 10 or 15 years ago, and while nice then, they have now improved the place with better walkways and plants.


Coblin’s Underpass may have been a new attraction.


Suspension bridges are always lotsa fun – Kim’s the one holding on tightly with both hands.

The view from Lover’s Leap is still spectacular.


Of course you can’t visit a rock city without panning for precious stones.


In this day in age, I’m surprised they still call this part of the trail Fat Man’s Squeeze. You’d think some organization of dimensionally challenged people would have made them change it.


Then it was back to the campground.


The owner has made improvements since we were here five years ago. The most visible was the addition of concrete patio pads at most sites. Unfortunately, the pads had been formed above grade, and just about all of the pads are now broken on one corner from Class A motor homes driving across them. But our blue rug successfully hid the damage.


Why yes – there was a pool, and the Boyz did find it.


While they swam, I went on patrol to see who else was there in the at-near-capacity campground. Although this Shasta is a cool-looking trailer, I laughed when I saw it because I thought, “You mean they still make these?” (Airstream owners are used to being asked this particular question.)


Supper that night was in Chattanooga’s Big River Grille and Brewing Works.


They served great food, and I especially enjoyed many of the local brews they had on tap. So much so that Kim was elected Designated Driver and Daniel the Designated Navigator for the trip back to the campground.


Jared appeared to enjoy having a different back-seat traveling companion.


Rainy Sunday found us a 1000 feet underground hiking to visit Ruby Falls. There were plenty of neat stalactites & stalagmites along the way to look at.


And America’s tallest underground water fall was pretty cool too.


The tour exited atop Lookout Mountain from where we could see the Tennessee River winding its way around Chattanooga.


Grilled burgers and s’mores capped off a great trip.


The trip back home on Labor Day itself was pleasant because we had the entire day in which to do it. The rest of the day lived up to its name while unloading the Overlander and cutting the grass.

There was a message on the answering machine from a local merchant advising us that the stuff we ordered had arrived. Stay tuned for “Big Tub Gets Shades”.


Thursday, September 3, 2009

Baby needs new shoes

Back before the birth of my first child, Kim enrolled us in a birthing class taught at the hospital. As my first plan during the actual delivery had been to pace in the waiting room while she did all the hard work, the class opened my eyes as to where in the hospital Kim expected me to be.

The bulk of the class members were, like us, thirty-something year-old professionals who were just now starting families. One evening, all the fathers-to-be were segregated to listen to a young nurse tell us how rough life was going to be after the baby arrived. We all listened patiently as she worked herself into a lather before posing her climactic question, “The doctor says your baby needs special shoes, and they cost $50. What are you going to do?”

We all looked at each other like it was a trick question before the man to my right plaintatively said, “I would buy them.” Everyone nodding in agreement appeared to surprise the nurse, and the rest of her presentation was a little less dramatic. Telling Kim about the incident later, we laughed and agreed that sometimes there are things in life where cost is just not an issue.

A few months ago, I noticed one of my Kawasaki Zephyr 750 front fork seals was leaking oil, and the brakes were getting a bit spongy. Purchased new in 1991, this bike has always been amazingly trouble free, and I had no qualms about spending time or money on it now. Not just this exact moment, though, because the shop floor was currently occupied with a furniture refinishing effort.

A couple of weeks ago after returning home from a ride in the country, I noticed the rear turn signals dangling freely from their wires instead of standing parallel to the road – Age had apparently caught up with the signals’ plastic pedestals.

Although Kim now worries when I go motorcycling, she always smiles when she sees me in riding leathers, and this day was no different. Coming in from the shop, I let her smile for a bit before I said, “Baby needs new shoes”. She nodded, and I moved on to start a list of what the bike needed.

The Internet certainly makes researching/acquiring parts easier & faster than it used to be. In what appeared to be a stroke of good luck, one on-line parts house listed OEM parts available for every item on my list. So they got a big order which included new fork seals, fork oil, front & rear brake hoses, pads, caliper boots, and rear turn signals.

But it was too good to be true. A couple days later, after charging my card for the full amount, they emailed that the brake hoses and turn signals are No Longer Available. Fortunately, the demand for old motorcycle and ATV parts is such that these parts are available from aftermarket companies. So with the help of two other on-line marketers, my 18 year-old baby now had new shoes.

The “old shoes” had to be removed first:

Motorcycles used to take up a lot of my time, and as a consequence my toolbox still had the special tools required for the current effort.


The last time the fork oil was changed, Super-Duper competition fork oil with moly was chosen as the replacement fluid as I was single, invincible, and thought such a blend was needed to accomplish my goal of wearing the sides of my motorcycle’s tires out long before the centers. I failed to meet that goal, and now that I’m married, and mortal, the forks were refilled with off-the-shelf fork oil. If nothing else, it is way easier to clean up than the exotic stuff used last time.


The aftermarket brake hoses did not look anything like the originals. But they were the correct length, and the new, different length banjo bolts supplied allowed the hoses to connect properly. The new turn signal lights were all but identical to the old ones.


It was fun to work on a motorcycle again, and I still remember the priorities in my life when such fun took up more of my time. But life is all about changing priorities, and my next goal will probably be keeping one of my new priorities from piloting an old one before he’s older.


I suspect his mother will take an interest in that one.
.
Stayed tuned for the Labor Day trip to Raccoon Mountain. My Overlander is looking forward to a return visit.